Misson Statement

Mission Statement
Earth Servant is an offering of information for the public. The goal is empowerment. Through recipes, curriculum, homesteading basics, earth-care know how, peasantry life and food sovereignty, may this information help in some way.

Thursday, May 15, 2014

LIVER and HEART for LIFE!

Liver, Heart, Sweetbreads, Tripe, Brains, etc you get the idea...organ meat has proved to be the most difficult food to train into my American pallet. About six years ago I was lucky to get the chance to tour around China. I tasted all kinds of foods and found that organ meats and unique animal parts were a staple of the Asian diet. I dined on rabbit stomachs served in onion broth, chicken feet boiled, skinned, and fired, for lunch in Beijing one day I got a steamy bowl of stewed duck tongues, and once, for dessert a woman suggested the pudding. I nodded eagerly not realizing the pudding was made with congealed pig blood. At the time my interest in these foods was not nourishing my body with minerals and vitamins, I was loading a quiver of horror stories to tell my friends when I got home. How silly. Now when I think back on those experiences I wish I would have paid attention to the spices they used, and how they cut and prepared the meat. Because years later, here I am, just beginning to appreciate and want to eat these foods. 

Muscle meat is tasty, that's for sure. But, if you are looking to feed your body and give it the essential minerals and vitamins it needs, organ meats are far superior. In a wolf pack the alpha wolf gets first pick of the kill. This wolf chooses to eat the liver and the heart. It leaves the muscle meat for the underlings. The alpha wolf eats those parts, because it wants the most potent, nutrient dense food to consume, so it can remain ontop of the pack. This fascinates me. How could our culture be so far away from this? So, I began to explore eating these foods. I have found that the most palatable way to get them into your diet is to make pate! It is a great way to forge a better culinary relationship with organ meats, you just mix them up with allll kinds of other shit so you can't see or even really taste them! ha! 

FAIL PROOF LIVER/HEART/ANY OTHER ORGAN CONSUMPTION RECIPE

(This recipe is adapted from Sally Fallon's Nourishing Traditions)
1lbs of Liver and Heart (from pastured animals not fed hormones, anti-biotics, and ideally herbally wormed)
4tbls Organic Pasture Butter
3/4lbs of Mushrooms (Criminni or Portabella work very nicely)
3/4 cups cooking wine (Homemade fruit wines are lovely to use if you have them)
1/2 Lemon
1tbls chopped fresh or dried Rosemary
1tbls mustard powder
1tbls dill
1/8 cup chopped Chives
1 cups chopped Onions
4 cloves garlic
1 stick of butter

When preparing the liver and heart the most important thing to do is remove the connective tissue that surrounds the flesh. It is very thin and can be tedious to deal with, but it is essential! Cut it into small chunks with all the sheathing removed. All you should have is a pile of shiny purple flesh.

Cook the onion, garlic, mushrooms, rosemary, and chives together with 2tbls of butter. At the same time you can begin to cook the liver and heart in another pan with the remaining 2tbls of butter. Add in the mustard, dill, and lemon to the meat. Keep cooking until browned. Add the wine to the meat and cook with the lid off until all the liquid is gone.

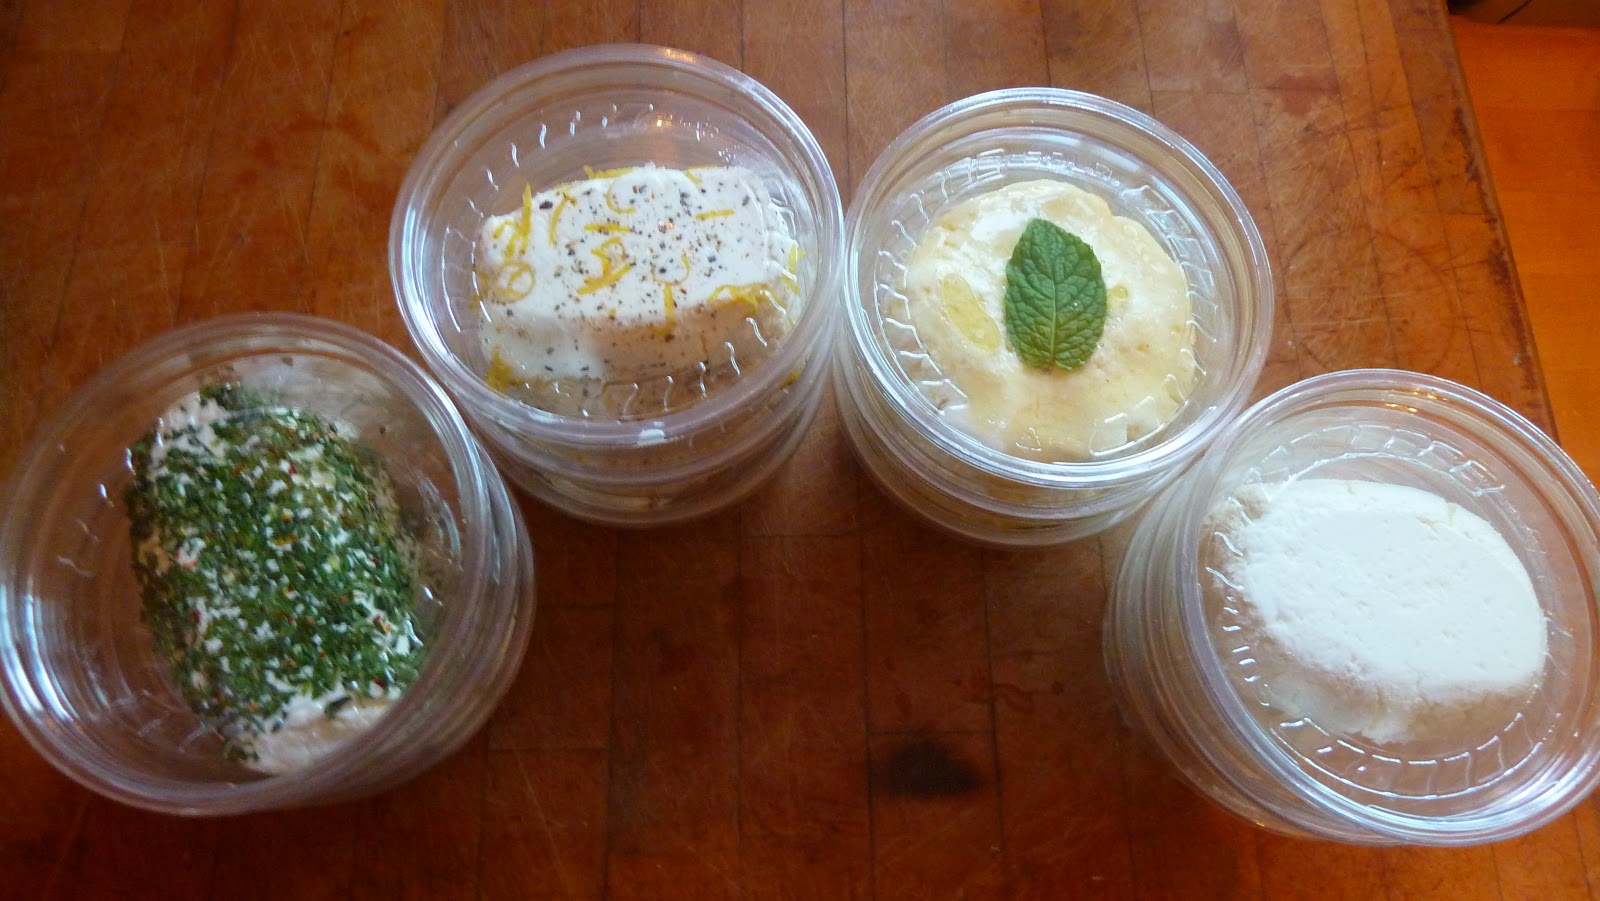
Once all is cooked combine the mushroom onion dish, 1 stick of butter, and the liver and heart dish in a blender, Cuisinart, or Vita-mix to blend down into a paste. Once it is smooth and well combined put in a container and cool in over night in the fridge.

Eat on crackers, use as a sandwich spread, or eat on carrot sticks! You are effectively eating liver and heart and you will be wanting more!

Another time in South Eastern Asian I was walking down a dusty market street. An old woman came into the market carrying a large silver bowl on top of her head. A crowd formed around her as she began to accept money for whatever was in her bowl. The mob began to rile and push because it seemed she was running out of sales. All the while balancing this bowl. Finally She brought the bowl down and I saw what all the fuss was about. Monkey brains floating in blood! Maybe someday I could be as excited about brains as those villagers were...but for now, I am pleased with my liver and heart pate!


Friday, February 1, 2013

The Magic and Magesty of Bone Stocks

The most valuable thing I have learned on these chilly winter days, holed up in the kitchen, is how to create nutritious soup stocks. It is the KEY to good soups and stews, and the difference between homemade and store-bought is absolutely worth the minimal time and energy involved.

Making stock is like creating a magic potion. It is a powerfully infused liquid that is filled with minerals, vitamins (which are essential to our commonly deficient bodies) and amazingly rich flavor. Obviously vegetable stocks are a great soup base to build off of if you don't eat meat. When making vegetable stocks you want to make sure you use a diversity of vegetables and herbs to give you a diversity of flavor. But vegetable stocks lacks the richness in minerals that make bone broths a potent healing medicine.

Bones are the frame work of your body, they are the earth component, the foundation. When you infuse water with the minerals in bones you are harnessing the elements that will in turn feed your body what it needs to have a strong and healthy foundation. Specifically...

Bone broth contains a few critical elements that contribute to foundational health. One of the most key components is gelatin. Gelatin is essentially collagen, which is found in all connective tissues, ligaments, joints, skin, and bones. Gelatin is hydrophilic, meaning it attracts liquid, even after it has been heated. This property makes it an essential aid in digestion and used in the treatment of many digestive ailments. "The same property by which gelatin attracts water to form desserts, like Jello, allows it to attract digestive juices to the surface of cooked food particles." - Sally Fallon, Nourishing Traditions.

To makes sure you get a good dose of gelatin in your stock you want to put in bones with lots of connective tissues. Skin also has a lot of gelatin as well. Commercial gelatin is largely made from industrial pigskins and a kind of salt that is similar to MSG, so avoid store bought gelatin if you can. You know when your stock is especially rich with gelatin when you cool it and it turns to a solid jiggly mass...that's the good stuff!

If you are making a chicken or fish stock it is good to just boil the carcass whole, or cut up into sections. Fish stock is hailed as a miracle cure-all in many cultures and is consider by some to be the most nutritious, easiest, and cheapest stock to make! With beef bones, which you can find from a local farmer or usually can be bought at a health food store, it is good to roast them first.

Another good way to make stock is to use the by-products of other meals. For example, you roast a chicken or a pork shoulder...once you take the meat off you have a carcass that can be saved and put into the stock pot. You can add vegetable scraps, as long as they are relatively fresh, and there you go!

Here is a basic Chicken Stock recipe


1 whole roasted chicken - I take the meat off after roasting and put aside to add to the soup later. Then you can chop up the carcass, or leave it whole, with feet and head if possible!
SIDE NOTE on chicken feet. They are packed full of gelatin and other great flavor and nutrient enhancing qualities to add to you stock. When incorporating them you will want to briefly blanch them, peel the outer skin off, and then cut the nails off.
2 whole onions, chopped up with skin and all if you like.
1 head of garlic ~ same as onions
4-6 sticks of Celery (the center part with the leaves is always a good choice, and tends to be left over)
3-5 unpeeled carrots - chopped with butt-ends and all
a handful of Parsley
2 springs of Rosemary
a splash of vinegar or wine - this helps to draw more minerals, particularly calcium, magnesium and potassium, into the broth.
and up to
1 1/2 gallons of water - you can substitute 1/2 the water for whey if you have it.

Bring all ingredients to a light boil and if any foam forms skim this off. The foam is fat impurities that add off-flavors to your stock. Once you are foam free simmer (not boil) for at least 4 hours. Then strain out the vegetables and bones and compost them. You can store your stock in jars in the fridge for up to two weeks. You can also freeze your stock in bags or freezer safe containers for much longer. Keep in mind portion sized storage ~ if you are cooking for 1 or 2 store your stock in 2-4 cups containers. 

You can use your stock to make delicious soups, gravy, or to cook rice or other gains with.You can also soak your dog's food with watered down stock - great way to boost their nutrient intake!

(I plan to add better pictures to this post...as soon as I make my next stock!)


Thursday, December 27, 2012

A New Era Begins

Seeing the Mystery

Been a while since I have posted. Too much happens in life at times and time fades into years easily. With that said I, Nicholas Richard Mahmood, am back with some updates, idea's, and thoughts on living in a new era of existence. I believe we are in a time where our priorities as a species must shift from consuming to creating, from hurting to healing, and from ego to spirit. It is a time to learn and to remember what is truly ours to care for. We live on a planet, and that my friends is special, so special it seems we must honor how important and powerful that statement truly is. This earth, born of the universe, this universe, born of the cosmos and the cosmos born of the mystery. How could it be any other way? Why a need for explanation?? We now exist in a time where new energy is being received by Earth from the cosmos, it is our responsibility to pay attention to that piece of ourselves we all have, spirit and become receptive to the incoming forces from the solar systems of the universes. One simple way to find your connection to the whole picture is to look at the sun, gaze at the horizon while the sun slips away or is born into the day. Look to the moon just look at it... see it for what it is, something pulling at you, at your self, you can feel it... I know you can, cause everything on the planet feels it. We can see the ocean feel it in tides, a good farmer sees the plants feeling it... I know it is there and so I look at it and love it for simply being. As we pay attention and praise existence we begin to hear the messages that unifies our souls to the mystery. That voice speaking a language all life can understand... that voice is our own calling us back to relation and caring. It's time to make a stand and begin listening to that voice of truth and love. It is our responsibility and role as humans to care, and worship, and love the Earth and the universe and all that is connected to existence including each other. Create health in your home by creating abundance and creating beauty and loving your own involvement in being. The plants and the animals, the rocks and the minerals, they are here to support life. Thanks to Earth, Water, Air and Fire, they are here to support and create life, and thanks to spirit for inhabiting physical beings and sharing love. These are some thoughts to ponder with your heart, a window to awe. And we are off!! A brand new era of life beginning from now, this moment. Enjoy.
Born into the new Era

Wednesday, October 31, 2012

New Goat Times - Chevre!

CHEVRE!


The classic french Chevre. Creamy, white, sweet, and luxurious. This is the quintessential goat cheese, and it is easy and thrifty to make on your own! I have been through 3 years of trial and error with this cheese and finally I feel confident to blog about my personal process with making this fabulous cheese.

This particular recipe is a 4 gallon batch which is fairly large so I will also provide the one gallon amts in [brakets]

Ingredients & Materials
4 gallons raw goat milk [1 gallon]
1 cup of cultured buttermilk (ideally organic) [1/4 cup]
1 1/2 drops of calf (sometimes labeled 'animal') rennett [2/5 of a drop]

    *you might wonder how you can get a 1/2 of a drop or even 2/5 of a drop of something...well here is the trick...
get 1 cup of water, put one drop of rennet in that cup, stir it up. Then pour out 1/2. you are left with a 1/2 cup of water and a 1/2 a drop! Same concept with 2/5...you put 1 drop in 1 cup of water, stir up, then pour out 3/5 of a cup...leaving you 2/5 water and 2/5 of a drop.

Stainless Steel pot & lid
Stirring spoon
Thermometer
Cheese Muslin (not cheese "cloth" that you find in the grocery store, that is not fine enough for this cheese (or most cheeses really...) you can find cheese muslin at a brew store, online, or at joanne fabrics.
Large bowl
Scoop/ ladle for curds - I use a small pot with a handle.
Some rope

Step ONE.
First you need to sterilize your materials. I get the pot I am going to use and put in about a inch of water, along with all my tools (spoon, thermoneter, and scoop) that will touch the milk. I put the lid on the pot and let the water boil and steam everything for 2-5 mins. After I put my tools in a clean bowl on stand by.

Step TWO.
Pour in your milk!
Step THREE.
Now you need to heat the milk up to 74 degrees. This is an ideal temperature for the buttermilk to culture the milk. As you heat the milk up, stir periodically to make sure it is heating evenly and not sticking to the bottom of the pot.
Step FOUR.
After you have reached temperature it is time to add in your buttermilk. Stir well.


Step FIVE.
Let the milk sit for one hour while it ripens.

Step SIX.
After an hour of ripening add in your rennet. You want to stir in a downward motion to incorporate the rennet properly. Rennet has a very low density, which makes it tend to float on the surface of the milk unless stirred downward. Do this for 15 seconds or so, then slow the milk down with your spoon. Now you want to put the cover back on and let it sit undisturbed in a warm place for 8-12 hours. 
This long curdling process is called 'lactic acid coagulation'. Which means that the cheese naturally curdles on its own - only spurred on by a very very small amount of rennet. The bacteria in the buttermilk metabolizes the milk sugars into lactic acid that then act as the curdling agent for the cheese. The little bit of rennet you add helps with the texture and speed of this happening

Step SEVEN.
After a long period of waiting...you get to check on your cheese. If it looks and feels like thick yogurt with a yellowy covering of whey, you have your chevre curd ready to hang.

This is a very good looking curd ;)


If the curd looks like this...floating on the surface...with tons of tiny holes in it...you have a contamination situation - most likely yeast. A good tip is to not make your cheese in that same room as you ferment wines, beers, or bake fresh breads.


This is not a good looking curd :(

Step EIGHT.
Now you can get yourself a big bowl - big enough to hold the same amount of liquid as the pot your using. Line it with your cheese muslin, and ladle out the curds into the cloth and bowl. Once all the curd is ladled out, you can bring up the ends and tie an over hand knot. You can easily rig up a cheese hanging system with a rope over a ceiling beam, but you can also just as easily hang it from a hook. Just make sure you hang it with enough space to drain out all the whey.


 Step NINE.
Let your curd drain for another 8-12 hours. When it is done draining it should be the consistency of a fluffy cream cheese. You can add all kinds of flavoring. Pictured below is from left to right - parsley and red pepper, lemon peel and black pepper, Honey and mint, and last but certainly not least the immaculate plain. You can  store it in the fridge for weeks, and you can also freeze it for months. Abbondanza!


Saturday, June 2, 2012

Spring Worship

  In the spring a farmer is sure to be busy among the fields watching and waiting for the cues from nature to reveal themselves. Magic is happening all the time in spring, as soils warms and sun shines on winter dampened soils, an awakening is the season. The moon begins to pull at the earth servant's  heart and seeds get planted, happily and in excess as a celebration of the magic of spring. Spring time is a time of worship and the church is the earth, prayers for this season and abundance of our union with nature are made in our efforts afield. To partake in the dedication and commitment to feeding people is a sacred act of faith. As an earth servant it is my responsibility to promote health to the land, to stand for methods that care and tend the soil, and to be guided by my heart. Spring is in the air, the moon is half full, time to plant fruiting veggies.


Thursday, April 26, 2012

Rendering Fats

Rendering fat is a simple and gr-easy process! The first step is finding an animal to harvest the fat from. Lots of hunters discard the fats of their animals, especially Bears. Bear fat is a wonderful rendered fat, and if processed correctly will turn out pearly white with a mild fatty scent. Even the most delicately processed Pig lard tends to retain an odor of pork. Which turns out to be ideal to cook with, especially savory things like tortillas or frying.  Beef fat is also nice when rendered, though it is not as silky as Bear. Make some calls to any hunter friends of yours, on just put it out into the community (Craigslist?) that your interested in it. You can also, obviously raise or hunt the animal yourself. When dressing the animal make an effort to leave the fat trimmings as clean as possible. This will save you time in the process.

Once you have your fat, put it in the freezer and let it freeze through (at least 24 hours). Pick a day when you have a good 6 hours of free time and energy to process your fats. To prepare for the process you will need:
  • A sturdy cutting surface with cutting boards
  • Sharp knives
  • 1 bowl of steamy hot water (to be refilled periodically)
  • 1 bag for discarded scraps
  • 1 large steel pot
  • A heat source (propane stove, wood fire, or stove top)
  • 1 large stirring spoon (wood is best)
  • Rags for hands
  • Cheese muslin or cheese cloths for straining at end
  • Enough clean glass jars to contain the amount of fat being rendered
Step 1 - thaw fat.
Pull out your fat from the freezer and let it begin to thaw as you set everything up.

Step 2 - prep your station.
Set up your cutting table with cutting boards, knives, numerous rags, hot water, and a place to discard scraps.

Step 3 - prep the pot.
Get your steel pot ready to be filled with fat chunks, and your heat source ready to use.

Step 4 - cut the fat.

Begin to cut up your fat chunks. The goal with this is to end up with completely clean small chunks of fat with no debris or meat still attached. Once you have a clean piece of fat, cut it up into small square inch pieces. This can be tricky as your hands and knife get super greasy, so be careful and go slowly.
The reason you want a completely clean piece of fat with no hunks of meat or bits of dirt or hair is because the temperatures reached when simmering fat is much higher than water, so meat bits will char and hair burns and gets stinky...this is the main reason people end up with off smelling and tasting rendered fat. It is the most time consuming part of the process, but if you take your time your product will be better.


Step 5 - getting your fat to run.

Once you have all your meat cut into small pieces and put into your steel pot you can begin to heat them. This process should be done very carefully and on low heat to begin. You do not want to heat up the fat too quickly. In the old Foxfire books this part is called 'getting your fat to run'. The fat is inside the fibrous tissues you just cut up. You want to gently heat the pieces up, getting the fats inside the chunks to liquefy and seep out. If you do this too fast, you essentially end up searing the tissues and cooking them. This impedes the fats to run out, kind of trapping them inside. This is also a way to get off flavors and smells. Patience is key, as well as stirring. Once you begin to heat the chunks you want to avoid any cooking/ sticking of the pieces to the bottom, so stir stir stir. You ultimately want to gradually increase the heat to be high enough that your melting the fats efficiently, but not so high that your fat will reach a boil. Keep this heating stirring process until you have what resembles a fat soup with chunks of flesh floating about.(yum) It can take over an hour, depending on how much fat you are running.


Step 6 - straining the fat.

Take your fat soup and pour it through a colander lined with a thin cloth (linen or cheese muslin/cloth will work) into your jars, or into another container to strain one more time into your jars. You want to get the liquid fat into your jars ASAP, so that it will set up (cool to a solid) in the jar. Once your jars are filled place them in a fridge for 1-2 days and then afterward freeze until your ready to use! They can also remain in your fridge and will keep for months.


Step 7 - squeezing the last bits.

After you have strained your free flowing fat out of the pot you can do one last ditch effort to get as much as possible out of your fat chunks. Scoop up the remaining chunks into a few layers of linen cloths, take up the ends and squeeeeeze until you get the last remaining fats in the tissues to come out. This is the greasiest part...and can be frustrating as well! BUT, you really can salvage quite a bit more fat by going though this step. There are such devices out there called 'fat presses' that do this step for you. You can also buy a sausage stuffer...and squish out the remaining fats that way!

Step 8 - enjoy and feed them birds.

You can use your rendered fat to infuse herbs, make salves, cook, and grease things. Birds love the fatty meat chunks you end up with afterwards. I have noticed as least with Bear meat and fat dogs don't tend to be interested! Which is a rarity.


    New Goat Times - Goat Midwifery!

    As the rain falls so do little goat kids from the uterus. This spring has been a whirlwind of activity for Nick and me - trying to find a new place to live, then moving all the animals and our belongings, scrambling against weather and time to establish growing beds, setting up a make-shift living area for our goats to have babies, and then having A LOT of kids born in a not-so-ideal space. Stress levels were high - but out of chaos came joy, and now we have lots of kids to lift the spirits and welcome in spring. We were also lucky in the fact that all the births went  smoothly with little complication.
    The birthing process for a goat is a very individual experience. No goat is going to do it the same as another. The best birthing story from this spring is from Pearl - our little pure bred Nigerian Dwarf. She showed me signs of pre-labor, including braxton hicks contractions and extreme fussiness a full two days before she decided to give birth at 3am after the second day! Epic. But she birthed two very cute little kids. Pictured below!

    Although we had no serious problems during birthing this spring, we did have two yearling does with delivering single kids - which tend to be larger. That makes it quite the stretch for a first timer! Something to keep in mind when dealing with first timers is to have olive oil on hand, so that you can add some extra lube and aid in stretching. If you feel like you need to help pull out a goat kid there are some VERY important things to remember.
    • If the babies are positioned normal everything should go fine.  Only help her if you feel like the kid has been in the birthing canal too long. What helps is to have a time keeping implement on hand. It is funny how time gets all fuzzy when you're watching a goat give birth. You think it has been hours and it has been 5 minuets.
    • Start timing how long they are in the birth canal after the water breaks and she begins to actively push. In general, 30 mins is the maximum amount of time they should be in the birth canal. In a normal "diving position" kid you can see the front hooves and nose. In this situation you can use the "rule of tongue" - If the tongue is blue - most likely it is time to help a little. But this is not a cut and dry issue - use your instincts and seek help if your nervous!
    • In the situation where you are going to be pulling on a kid take a firm hold of ONE hoof and gently but firmly slide it out until it is completely extended. This will help create a more arrow dynamic shape for the mom to push out. If she is still having trouble, you can do the same thing to the other leg.
    • Work with the mother's contractions. Do not be pulling on a baby when the mother is resting between contractions. This doesn't help the situation at all, only stresses the mother out even more. 
    • When you do help her, pull down - toward her haunches. Do NOT pull out away from her body. Pulling down works with the natural shape of her pelvis. If you pull out you increase her pain and probability of tearing.

     The best thing to remember is that a healthy well cared for goat is going to be set up very well to have an easy hands free kidding. They are really good at having babies, and tend to be excellent mothers. Here are some good things to have on hand waiting for your kids to arrive...
    • Olive Oil
    • Watch or Cell phone to keep time
    • Emergency contact numbers - breeders, vets, savvy neighbors etc.
    • Everclear or Vodka to sterilize implements if you need to enter the does vagina or uterus.
    • Cayenne - this can be used to stimulate weak kids (rub a VERY tiny amount onto their gums) as well as given to a doe after a difficult birth along with blackstrap molasses dissolved in warm water.
    • Clean towels - if you want to help the doe dry off her babies 
    • Heat lamp (chicken brooding lamps work great), if it is very cold - kids sometimes need extra warmth.
    • And a camera! of course.  
    This is really preliminary information and I recommend watching some you tube videos of goat births or better yet finding a breeder in your area who would let you come watch first hand.